Including temperature and offset corrections for the ultrasonic sensor HC_SR04 in the BeagleBone Black
In this post, I show how to include the air temperature in the calculus of the speed sound and include an offset value for the distance reported by the sensor. This value can be useful for example when the sensor is placed not at the edge of a robot and the measurements have to be subtracted to reference these at the robot’s boundary avoiding an undesired collision. This class is part of a whole library that can be found here.
I use a voltage level shifter between 3.3V and 5.0V to prevent damage to the BeagleBone. It is important to remember that the logic voltage for the BeagleBone is 3.3V. If the user provides a greater voltage, the BeagleBone could be damaged.
Circuit and components
The circuit can be seen in Figure 1. It consists of a voltage level shifter, an HC-SRO4, and the BeagleBone. The pins used for trigger and echo are P9_15 and P9_17 and these were configured as digital output and input respectively.
The components are:
- 1 Ultrasonic Sensor HC_SR04
- 1 Level Shifter for 3.3V - 5.0V TXS0108E
- 1 Protoboard mini
- Jumpers male-male to make the connections

Coding
First, an HC_SR04 object is declared with global scope using a previously GPIO declared objects and an overloaded constructor is used to include the offset in cm and the temperature in °Celsius:
1
2
3
4
5
GPIO triggerPin(P9_15);
GPIO echoPin(P9_17);

// Declaring the pins and the HC_SR04 object with offset and temperature correction factors
HC_SR04 distanceSensor (triggerPin, echoPin, 1, 25);
The overloaded constructor of the class takes these user values to include an offset and the temperature to estimate the sound’s speed in the air that will be used in the calculus of the distance. Both values are class private members of type double. For including the temperature to correct the speed sound, the next equation can be used. This is explained here.
The corresponding overloaded constructor with this corrections is shown in the next listing:
1
2
3
4
5
6
7
8
9
10
11
12
13
14
15
16
17
18
19
20
21
22
23
24
25
// Overload Constructor with offset and temperature for correction
HC_SR04::HC_SR04(GPIO newTriggerPin, GPIO newEchoPin, double newOffset, double temperature) :
        triggerPin(newTriggerPin), echoPin(newEchoPin)
{
  this->offset = newOffset;
  this->soundSpeed = 33130 + 60.6 * temperature; // Units in cm/s and ºC
  InitSensor();

  std::string message;
  message = "\nHC-SR04: Sensor object with trigger pin: " +
            this->triggerPin.GetPinHeaderId() + " / echo pin: " +
            this->echoPin.GetPinHeaderId() +
            " was created!\n";
  std::cout << RainbowText(message, "Violet");

  std::stringstream streamSoundSpeed;
  std::cout << RainbowText("The sound speed that will be used is: ", "Violet");
  streamSoundSpeed << std::fixed << std::setprecision(2) << this->soundSpeed;
  std::cout << RainbowText(streamSoundSpeed.str(), "Violet") << std::endl;

  std::stringstream streamOffset;
  std::cout << RainbowText("The distance offset that will be used is: ","Violet");
  streamOffset << std::fixed << std::setprecision(2) << this->offset;
  std::cout << RainbowText(streamOffset.str(), "Violet") << std::endl;
}
The class method MeasureDistanceCm() to measure the distance works with the modified offset and speedSound values if the user has included these in the constructed HC_SR04 object. In another case, that method works with the default and standard values,i.e., an offset of 0.0 and a sound speed of 34300.0, respectively.
In the main program a for loop can be used to measure the distance 10 times each second using the MeasureDistanceCmWithMedian() which defines a window size to filter the data with a median value and calls the MeasureDistanceCm() method to do the reading:
1
2
3
4
5
6
double distance = distanceSensor.MeasureDistanceCmWithMedian(5);
for (size_t i = 0; i < 10; i++) {
  distance = distanceSensor.MeasureDistanceCmWithMedian(5);;
  cout << "Distance reading: " << i << " = " << distance << "cm\n";
  Delayms(1000);
}
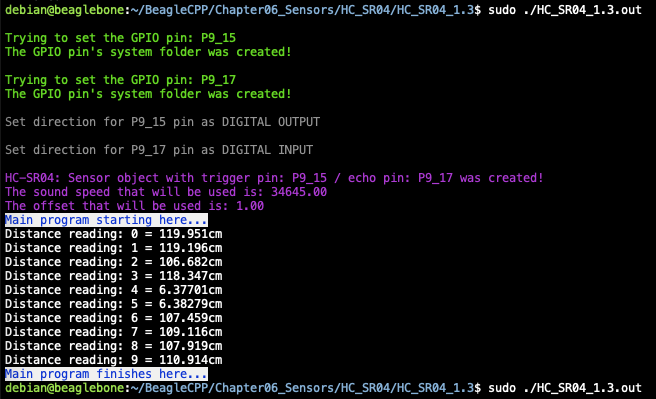
The complete code for this application is shown in the next listing together with its corresponding execution output.
HC_SR04_1.3.cpp
1
2
3
4
5
6
7
8
9
10
11
12
13
14
15
16
17
18
19
20
21
22
23
24
25
26
27
28
29
30
31
32
33
34
35
36
37
38
39
40
41
42
43
/******************************************************************************
HC_SR04_1.3.cpp
@wgaonar
29/06/2021
https://github.com/wgaonar/BeagleCPP

Uses a Median filter for each one of the 10 sensor readings each second.
The sensor object is constructed with offset and temperature correction factors

Class: HC_SR04
******************************************************************************/

#include <iostream>
#include <list>

#include "../../../Sources/GPIO.h"
#include "../../../Sources/HC_SR04.h"

using namespace std;

GPIO triggerPin(P9_15);
GPIO echoPin(P9_17);

// Declaring the pins and the HC_SR04 object with offset and temperature correction factors
HC_SR04 distanceSensor (triggerPin, echoPin, 1, 25);


int main() {
  string message = "Main program starting here...";
  cout << RainbowText(message,"Blue", "White", "Bold") << endl;

  double distance = distanceSensor.MeasureDistanceCmWithMedian(5);
  for (size_t i = 0; i < 10; i++) {
    distance = distanceSensor.MeasureDistanceCmWithMedian(5);;
    cout << "Distance reading: " << i << " = " << distance << "cm\n";
    Delayms(1000);
  }

  message = "Main program finishes here...";
  cout << RainbowText(message,"Blue", "White","Bold") << endl;

  return 0;
}
Execution of the program:
Se you in the next post.