In this post, I show how to blink in order six LEDs in the BeagleBone Black using Delays routines. This is done with the DelayMilliseconds function which uses the C++ sleep_for method for blocking the program while the delay is executing.
Circuit and components
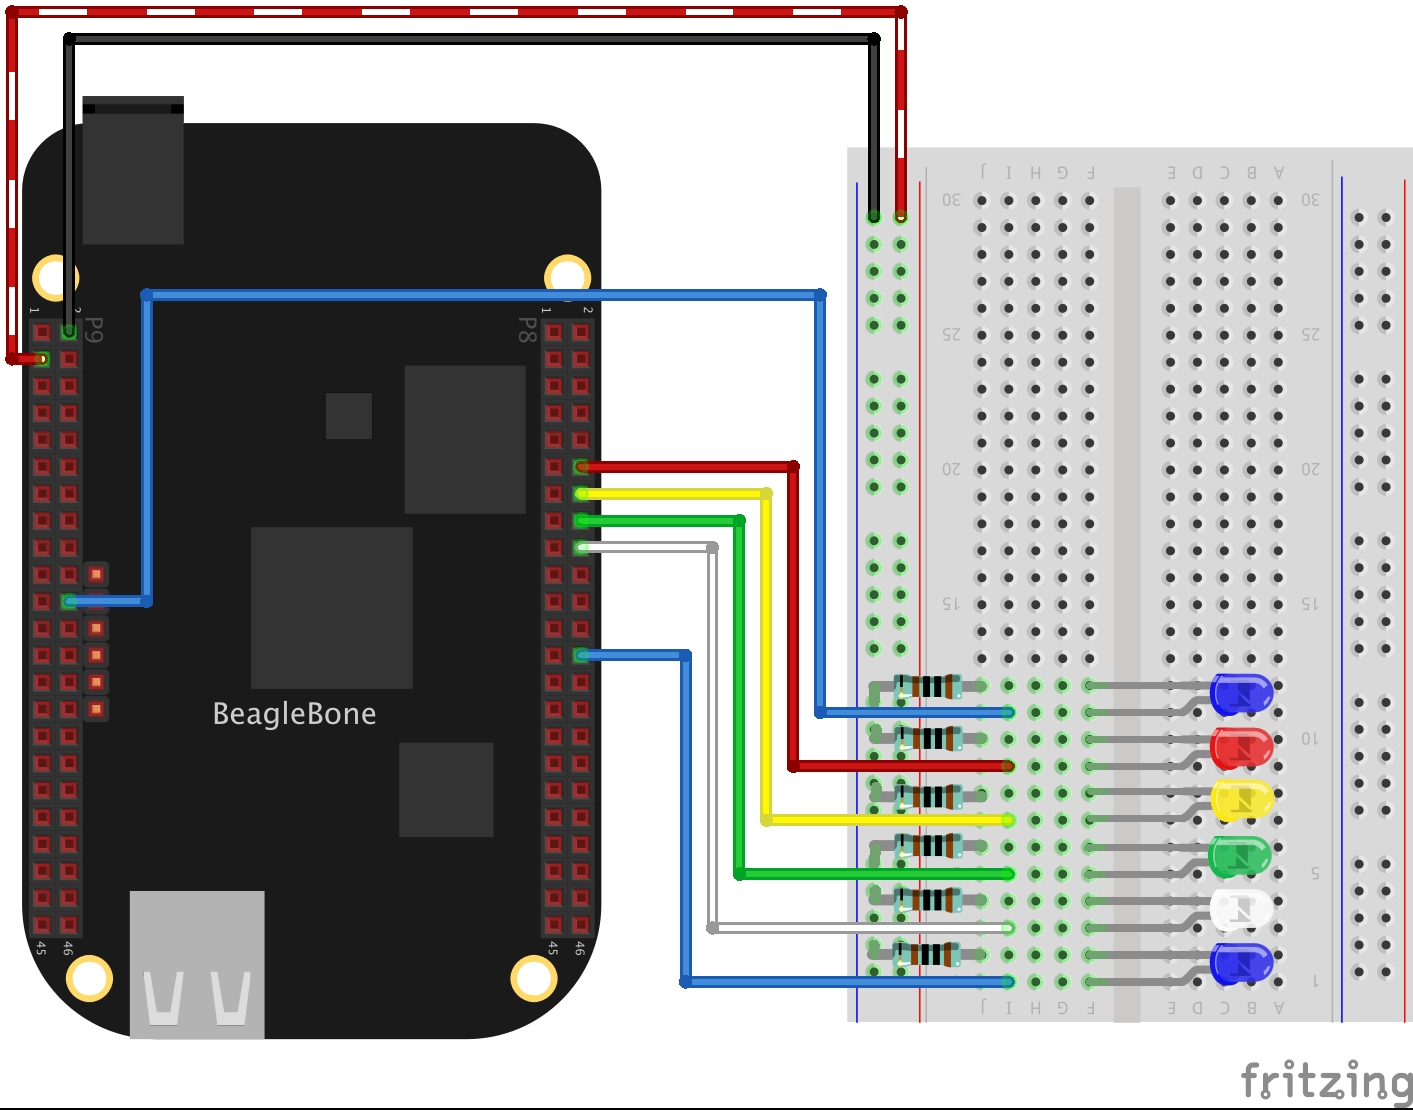
The circuit can be seen in Figure 1. Please keep in mind that the BeagleBone works at 3.3V and not 5V like microcontrollers as Arduino. It is so important to avoid damage to the board, especially when you are working with buttons or digital inputs in general.
The components are:
- 6 Resistors of 1KΩ
- 6 LEDs
- Jumpers male-male to make the connections
Coding
Initially, the GPIO objects are initialized as OUTPUT pins.
1
2
3
4
5
6
GPIO blueLed1(P9_22, OUTPUT);
GPIO redLed(P8_12, OUTPUT);
GPIO yellowLed(P8_14, OUTPUT);
GPIO greenLed(P8_16, OUTPUT);
GPIO whiteLed(P8_18, OUTPUT);
GPIO blueLed2(P8_26, OUTPUT);
Next, each one of six LEDs are set to HIGH, waiting in this state for a certain time through the DelayMilliseconds() function before` turning ON the next one.
1
2
3
int time = 100;
blueLed1.DigitalWrite(HIGH);
DelayMilliseconds(time);
After that, the program does the inverse process setting each one of the six LEDs to LOW and waiting with the DelayMilliseconds() function before` turning OFF the previous one.
1
2
3
int time = 100;
DelayMilliseconds(time);
blueLed1.DigitalWrite(HIGH);
The complete code for the application are shown in the next listing together with its corresponding execution video.
Listing_1.3
1
2
3
4
5
6
7
8
9
10
11
12
13
14
15
16
17
18
19
20
21
22
23
24
25
26
27
28
29
30
31
32
33
34
35
36
37
38
39
40
41
42
43
44
45
46
47
48
49
50
51
52
53
54
55
56
57
58
59
60
61
62
63
64
65
66
67
68
69
70
71
72
73
74
75
76
/************************************************************************
Listing_1.3.cpp
@wgaonar
24/03/2021
https://github.com/wgaonar/BeagleCPP

Turning ON / OFF  six LEDs in order

Class: GPIO
************************************************************************/
#include <iostream>
#include "../../Sources/GPIO.h"

using namespace std;

int main()
{

  string message = "Main program starting here...";
  cout << RainbowText(message,"Blue", "White", "Bold") << endl;

  GPIO blueLed1(P9_22, OUTPUT);
  GPIO redLed(P8_12, OUTPUT);
  GPIO yellowLed(P8_14, OUTPUT);
  GPIO greenLed(P8_16, OUTPUT);
  GPIO whiteLed(P8_18, OUTPUT);
  GPIO blueLed2(P8_26, OUTPUT);

  char userInput = '\0';
  while (userInput != 'y')
  {
    int time = 100;
    blueLed1.DigitalWrite(HIGH);
    DelayMilliseconds(time);

    redLed.DigitalWrite(HIGH);
    DelayMilliseconds(time);

    yellowLed.DigitalWrite(HIGH);
    DelayMilliseconds(time);

    greenLed.DigitalWrite(HIGH);
    DelayMilliseconds(time);

    whiteLed.DigitalWrite(HIGH);
    DelayMilliseconds(time);

    blueLed2.DigitalWrite(HIGH);
    DelayMilliseconds(time);

    blueLed2.DigitalWrite(LOW);
    DelayMilliseconds(time);

    whiteLed.DigitalWrite(LOW);
    DelayMilliseconds(time);

    greenLed.DigitalWrite(LOW);
    DelayMilliseconds(time);

    yellowLed.DigitalWrite(LOW);
    DelayMilliseconds(time);

    redLed.DigitalWrite(LOW);
    DelayMilliseconds(time);

    blueLed1.DigitalWrite(LOW);
    DelayMilliseconds(time);

    cout << "Enter 'y', to finish the program: " << endl;
    cin >> userInput;
  }

  message = "Main program finishes here...";
  cout << RainbowText(message,"Blue", "Bold") << endl;
  return 0;
}
Execution of the program:
Se you in the next post.