In this post, I show a simple application to read and analog voltage with the ADC C++ class implementation shown previously in this post. Remembering that the BeagleBone has 7 analog inputs and ADC of 12 bits that let to de user to represent an analog signal within a range of 4096 values. It is important to remember that the reference for analog voltage is 1.8V. If the user provides a greater voltage, the BeagleBone could be damaged.
Circuit and components
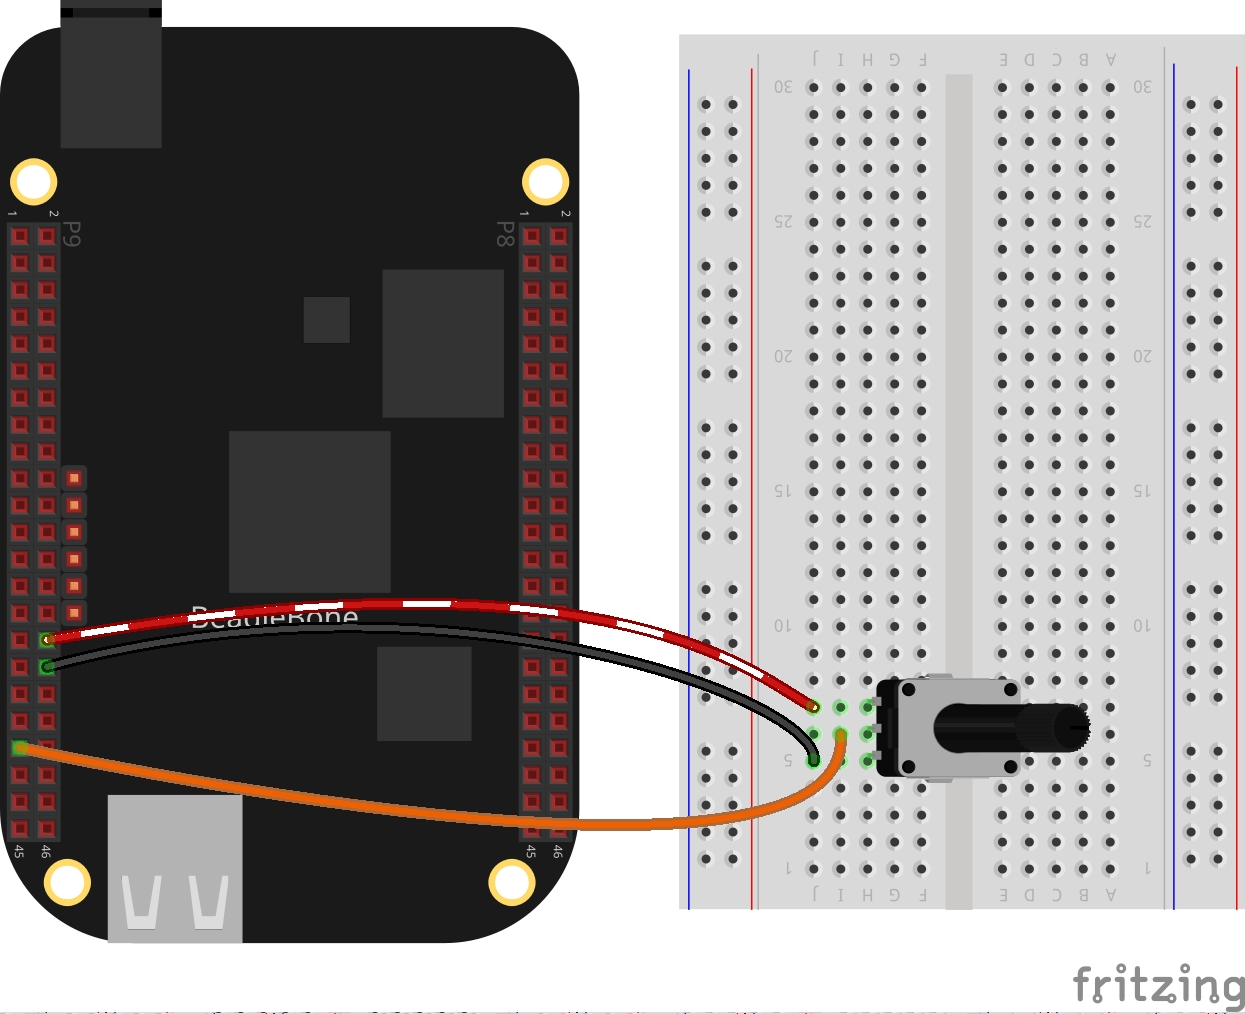
The circuit can be seen in Figure 1. It consists of a Potentiometer with a power supplied using the analog ground pin 0V located at the pin P9_34 and to analog VDD pin at 1.8V located at the pin P9_32. Finally, its output is connected to the P9_39 pin.
The components are:
- 1 Potentiometer of 200KΩ
- Jumpers male-male to make the connections
Coding
First an ADC class object is declared, for example:
1
ADC adcPin(P9_39);
A float variable is declared and initialized to store the analog voltage.
1
float adcVoltage = 0.0;
The voltage values can be obtained through the next class method:
1
adcVoltage = adcPin.ReadVoltage();
In this case, the readings are taken through a user-defined function that runs on the background from the main program until a key from the keyboard will be pressed. It can be attached to the pin through the next method:
1
adcPin.DoUserFunction(&AnalogRead);
This callback type function can be a while loop which reads not only the analog voltage but the digital value too. For example:
1
2
3
4
5
6
7
8
9
10
11
12
int AnalogRead()
{
  while (stopAnalogRead == false)
  {
    adcValue = adcPin.ReadADC();
    cout << "ADC value on pin: " << adcValue << endl;
    adcVoltage = adcPin.ReadVoltage();
    cout << "Voltage on the pin: " << adcVoltage << endl;
    adcPin.Delayms(100);
  }
  return 0;
}
An aspect to take into account is the declaration of global variables in order to make it possible this function works.
1
2
3
4
// Global variables
bool stopAnalogRead = false;
int adcValue = 0;
float adcVoltage = 0.0;
The complete code for this application is shown in the next listing together with its corresponding execution video.
Listing_5.2
1
2
3
4
5
6
7
8
9
10
11
12
13
14
15
16
17
18
19
20
21
22
23
24
25
26
27
28
29
30
31
32
33
34
35
36
37
38
39
40
41
42
43
44
45
46
47
48
49
50
51
#include <iostream>
#include "../../Sources/ADC.h"

using namespace std;

// Global ADC pin declaration
ADC adcPin(P9_39);

// Global variables
bool stopAnalogRead = false;
int adcValue = 0;
float adcVoltage = 0.0;
int AnalogRead()
{
  while (stopAnalogRead == false)
  {
    adcValue = adcPin.ReadADC();
    cout << "ADC value on pin: " << adcValue << endl;
    adcVoltage = adcPin.ReadVoltage();
    cout << "Voltage on the pin: " << adcVoltage << endl;
    adcPin.Delayms(100);
  }
  return 0;
}

int main()
{
  string message = "Main program starting here...";
  cout << RainbowText(message,"Blue", "White", "Bold") << endl;

  // Call the function to read the pin
  adcPin.DoUserFunction(&AnalogRead);

  char userInput = '\0';
  while (userInput != 'y')
  {
    message = "Do you want to stop the readings on the pin? Enter 'y' for yes: ";
    cout << RainbowText(message, "Blue")  << endl;
    cin >> userInput;
    if (userInput == 'y')
    {
      stopAnalogRead = true;
      adcPin.StopUserFunction();
    }
  }

  message = "Main program finishes here...";
  cout << RainbowText(message,"Blue", "White","Bold") << endl;

  return 0;
}
Execution of the program:
Se you in the next post.