In this post, I will show you how to read a button with the BeagleBone Black. I have written a previous post that shows the same behavior. The difference with this post is that here, I have written a C++ class that contains specific methods to work with buttons. This class is part of the C++ library to access and control the general purpose digital pins (GPIO) pins of the BeagleBone that I started to work in and described in these posts BeagleBone GPIO C++ class and BeagleBone Button C++ Class
Circuit and components
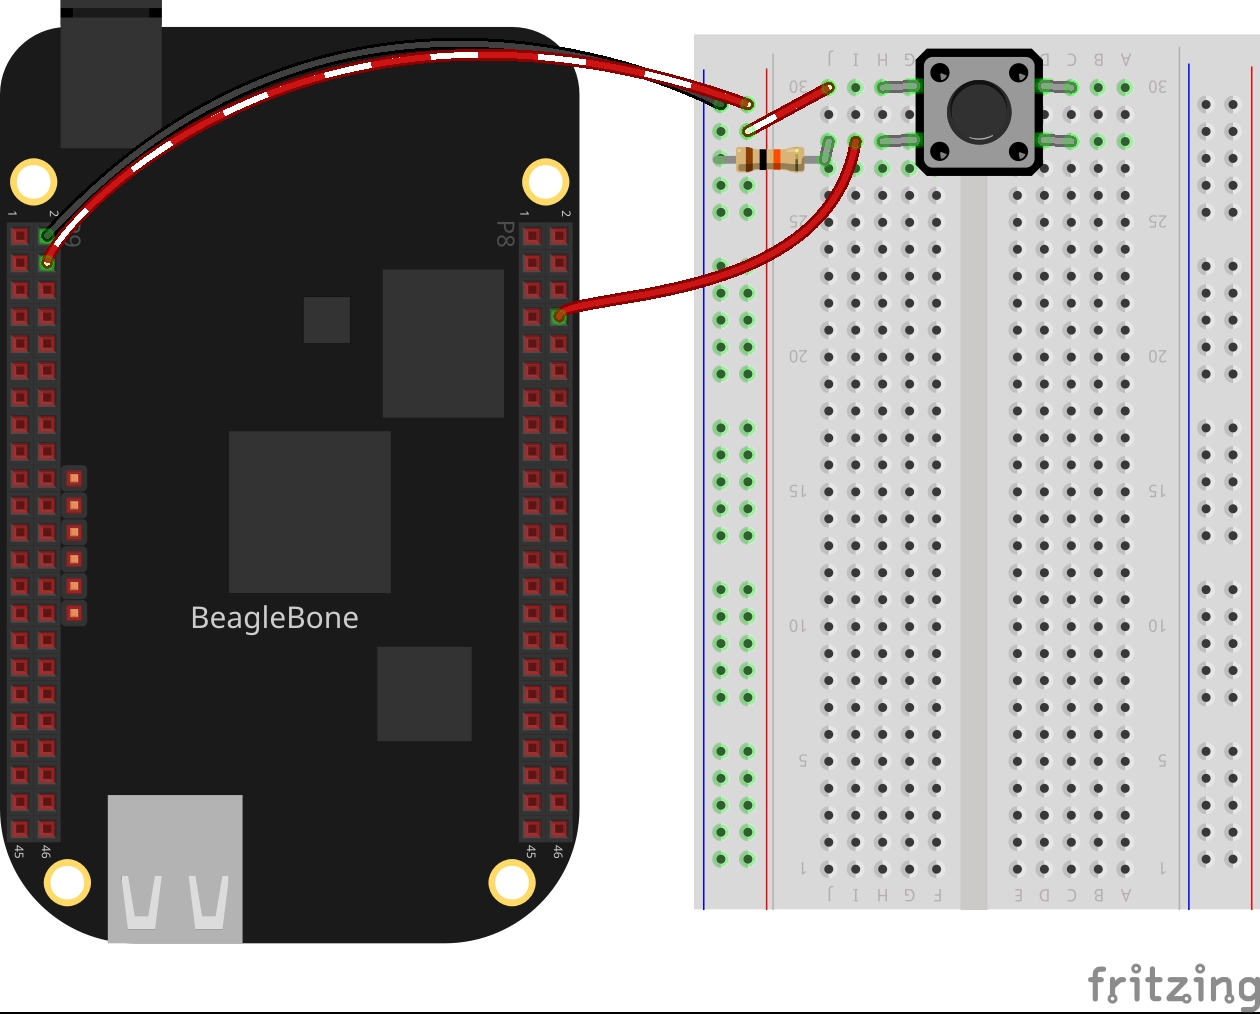
The circuit can be seen in Figure 1. Please keep in mind that the BeagleBone works at 3.3V and not 5V like microcontrollers as Arduino. It is so muy important to avoid damage to the board, especially when you are working with buttons or digital inputs in general.
The components are:
- 1 Resistor of 10KΩ as a pull-down resistor
- 1 Push button of 12mm
- Jumpers male-male to make the connections
Coding
The corresponding method to read a button into the class BUTTON who is derived from GPIO class mentioned earlier in the introduction. The method is:
ReadButton()
The ReadButton() method checks that the GPIO has been set up as INPUT
and returns the value of the pin that is attached to the button. This is done through a call to the
DigitalRead() method of the GPIO class.
1
2
3
4
5
6
7
8
9
int BUTTON::ReadButton()
{
  if (this->mode != INPUT)
  {
    perror("'ReadButton' method only works on INPUT mode");
    return -1;
  }
  return this->DigitalRead();
}
The button can be declared as a BUTTON object
specifying the pin attached to it:
1
BUTTON redButtonPin(P8_08);
In the main program a while loop can wait for the press of the button:
1
2
3
4
5
6
7
8
while (redButtonPin.ReadButton() == 0)
{
  if (redButtonPin.ReadButton() == 1)
  {
    message = "The red button was pressed!!!";
    cout << RainbowText(message, "Red") << endl;
  }
}
Complete code
The code is shown in the next listings:
BUTTON.h
1
2
3
4
5
6
7
8
9
10
11
12
13
14
15
16
17
18
#ifndef BUTTON_H
#define BUTTON_H

#include "GPIO.h"

class BUTTON : public GPIO
{
  public:
    // Overload constructor
    BUTTON(int);

    // Interface method to get the GPIO pin state
    virtual int ReadButton();

    ~BUTTON();
};

#endif // BUTTON_H
BUTTON.cpp
1
2
3
4
5
6
7
8
9
10
11
12
13
14
15
16
17
18
19
20
21
22
23
24
25
26
#include <iostream>

#include "BUTTON.h"
#include "RAINBOWCOLORS.h"

// Overload constructor
BUTTON::BUTTON(int newId) : GPIO(newId, INPUT) {}

/*
  Public method for reading the input from a button
  @return int:   The button state HIGH / LOW
                -1 Error in the pin's mode
*/
int BUTTON::ReadButton()
{
  if (this->mode != INPUT)
  {
    perror("'ReadButton' method only works on INPUT mode");
    return -1;
  }
  return this->DigitalRead();
}

// Destructor
BUTTON::~BUTTON()
{}
Listing_3.1
1
2
3
4
5
6
7
8
9
10
11
12
13
14
15
16
17
18
19
20
21
22
23
24
25
26
27
28
#include <iostream>
#include "../../Sources/GPIO.h"
#include "../../Sources/BUTTON.h"

using namespace std;

int main()
{
  string message = "Main program starting here...";
  cout << RainbowText(message,"Blue", "White", "Bold") << endl;

  BUTTON redButtonPin(P8_08);
  message = "Please, press the red button!";
  cout << endl << RainbowText(message, "Red") << endl;

  while (redButtonPin.ReadButton() == 0)
  {
    if (redButtonPin.ReadButton() == 1)
    {
      message = "The red button was pressed!!!";
      cout << RainbowText(message, "Red") << endl;
    }
  }

  message = "Main program finishes here...";
  cout << RainbowText(message,"Blue", "White","Bold") << endl << endl;
  return 0;
}
Execution of the program:
Se you in the next post.